
What Are the Top Implant Instrumentation Types for 2026?
Choosing implant instrumentation in 2026 is not simply a matter of buying a drill kit. Clinicians must match each instrument to the procedure, implant system, and operating environment. A surgical handpiece, calibrated drill sequence, depth stop, torque wrench, and prosthetic driver each serve a distinct role. Guided surgery kits add another layer, linking digital planning to physical positioning at the chair.
The market context is expanding. Grand View Research’s Dental Implants Market report estimated the global market at approximately USD 4.6 billion in 2023 and projected continued growth through 2030. That forecast describes market activity, not proof that one instrument type improves clinical outcomes. A useful comparison needs both evidence and practical detail. How does a drill handle heat and irrigation? Can a torque wrench be calibrated and maintained? Do guided components fit the clinician’s workflow? Small differences matter. A loose driver interface or unclear depth marking can slow a procedure.
This overview offers Implant instrumentation insights for evaluating the leading instrument categories expected to matter in 2026. It considers function, compatibility, precision, sterilization, and everyday usability. The “top” choice is not universal; case complexity, training, and system requirements all influence selection. That distinction is easy to miss. Market reports provide useful context, but readers should verify specifications against manufacturers’ instructions and current clinical guidance. A tidy kit is helpful, but it is not a substitute for sound judgment.
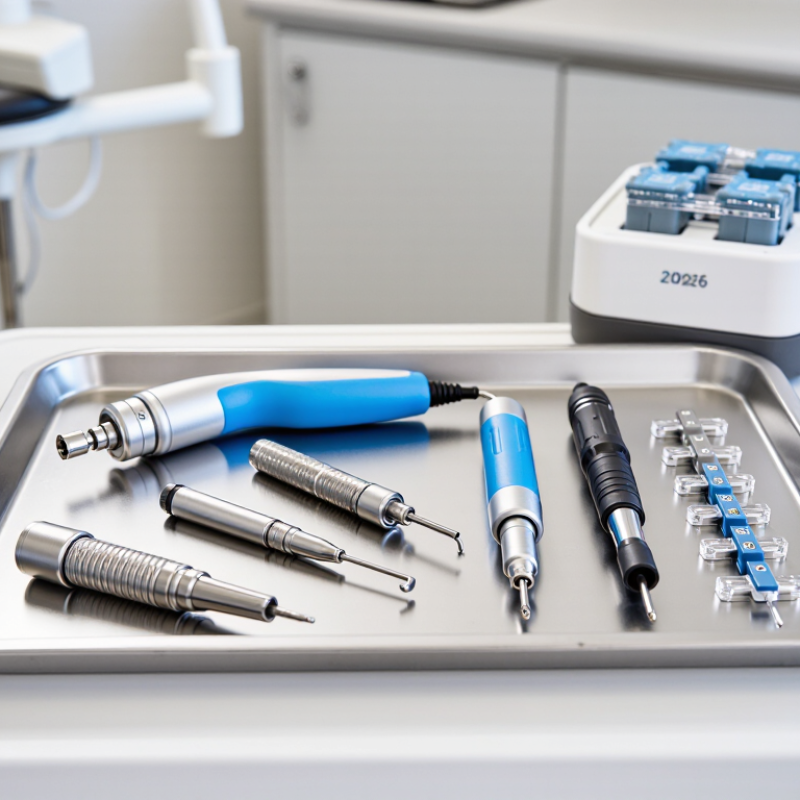
Core Components of a Dental Implant Instrumentation System
A dental implant instrumentation system brings the instruments for site preparation, implant placement, and component handling into one coordinated set. A typical tray includes sequential drills, depth gauges, parallel pins, implant drivers, and a torque wrench. Each tool has a distinct role. Drill markings help the clinician judge depth, while parallel pins make alignment easier to assess between sites. Small details matter.
Irrigation equipment is another core component. A steady flow of sterile saline helps cool the drilling area and clear debris. The handpiece must match the intended drills, and connections should be checked before use. Implant drivers need to fit the implant connection securely; a loose fit can complicate placement. A calibrated torque wrench supports controlled tightening, but its readings do not replace clinical judgment. Fit matters.
Organization affects how reliably the system works. Clearly arranged instruments make it easier to identify the correct drill sequence, while a sterilization tray helps keep reusable tools together through processing. Before a procedure, staff should check instrument condition, compatibility, and any manufacturer-specified limits. Wear can be subtle. A drill may look usable yet cut less efficiently, so inspection and timely replacement are important. No tray makes decisions for the clinician. Reviewing the setup against the planned case remains a practical step, even when the kit seems complete.
What Are the Top Implant Instrumentation Types for 2026? – Core Components of a Dental Implant Instrumentation System
| Instrumentation type | Core components | Primary function | Typical clinical considerations |
|---|---|---|---|
| Rotary handpiece and motor | Implant motor, compatible handpiece, foot control, irrigation tubing | Powers controlled drilling and other rotary steps during site preparation. | Use settings and compatible attachments specified by the equipment instructions. Maintain appropriate irrigation and follow the prescribed cleaning and sterilization process. |
| Osteotomy drills | Pilot drill, progressively sized drills, optional countersink or profile drill, depth markings or stops | Prepare the bone site to the planned diameter and depth for implant placement. | Drill sequence, speed, depth, and use of any optional drills depend on the implant system, bone conditions, and treatment plan. Irrigation and sharp, undamaged instruments are important. |
| Depth gauge | Marked probe or gauge compatible with the prepared site | Checks osteotomy depth and helps assess the prepared site. | Confirm the reference point and measurement markings before use; assess nearby anatomical structures using appropriate diagnostic information. |
| Parallel pins and direction indicators | Straight pins or indicators designed to fit prepared osteotomies | Help evaluate implant-site angulation and relative spacing during preparation. | Use with the treatment plan and appropriate views to check restorative alignment and site relationships before proceeding. |
| Implant insertion drivers | Handpiece driver, manual driver, and implant-specific connection interface | Engage and guide the implant during insertion. | Verify that the driver matches the implant connection and is fully engaged. Avoid applying force beyond the limits specified in the system instructions. |
| Torque wrench and manual ratchet | Wrench or ratchet, compatible driver, and—where provided—a calibrated torque mechanism | Provides controlled manual rotation for implant placement or compatible prosthetic procedures. | Torque values and permitted uses are component- and procedure-specific. Follow the applicable instructions; do not treat one torque value as universal. |
| Prosthetic drivers | Drivers for compatible cover screws, healing components, abutments, or prosthetic screws | Assist with placement and removal of implant-related restorative components. | Match the driver tip to the component and use the specified tightening method and torque where applicable. |
| Irrigation and suction accessories | Sterile irrigation line, fluid delivery components, and surgical suction tips | Support irrigation during drilling and removal of fluid and debris from the operative field. | Check flow and connections before use. Follow clinical protocols for sterile fluids and single-use or reusable accessories. |
| Bone and site-preparation instruments | Bone caliper, curettes, osteotomes, or optional profile and bone-shaping instruments | Support assessment or selected site-preparation steps when indicated. | These instruments are selected according to anatomy, surgical approach, and training; they are not required for every implant procedure. |
| Sterilization and organization accessories | Instrument cassette or tray, identification labels, and validated cleaning and sterilization supplies | Organize instruments and support consistent processing between uses. | Follow each instrument’s instructions for cleaning, inspection, packaging, sterilization, and reuse limits. A tray alone does not establish sterility. |
Related Posts
-
Top Bone Preservation Implants for Enhanced Dental Health Solutions?
-
Top 10 Femoral Hip Stems for Global Procurement Needs?
-

Exploring the Benefits of Minimally Invasive Arthroplasty in China Best Practices?
-

Top Prosthesis Fixation Methods You Should Know?
-
Top 10 Hip Implant Solutions for Global Buyers Today?
-

Top 10 Biocompatible Implant Materials in China for Medical Applications